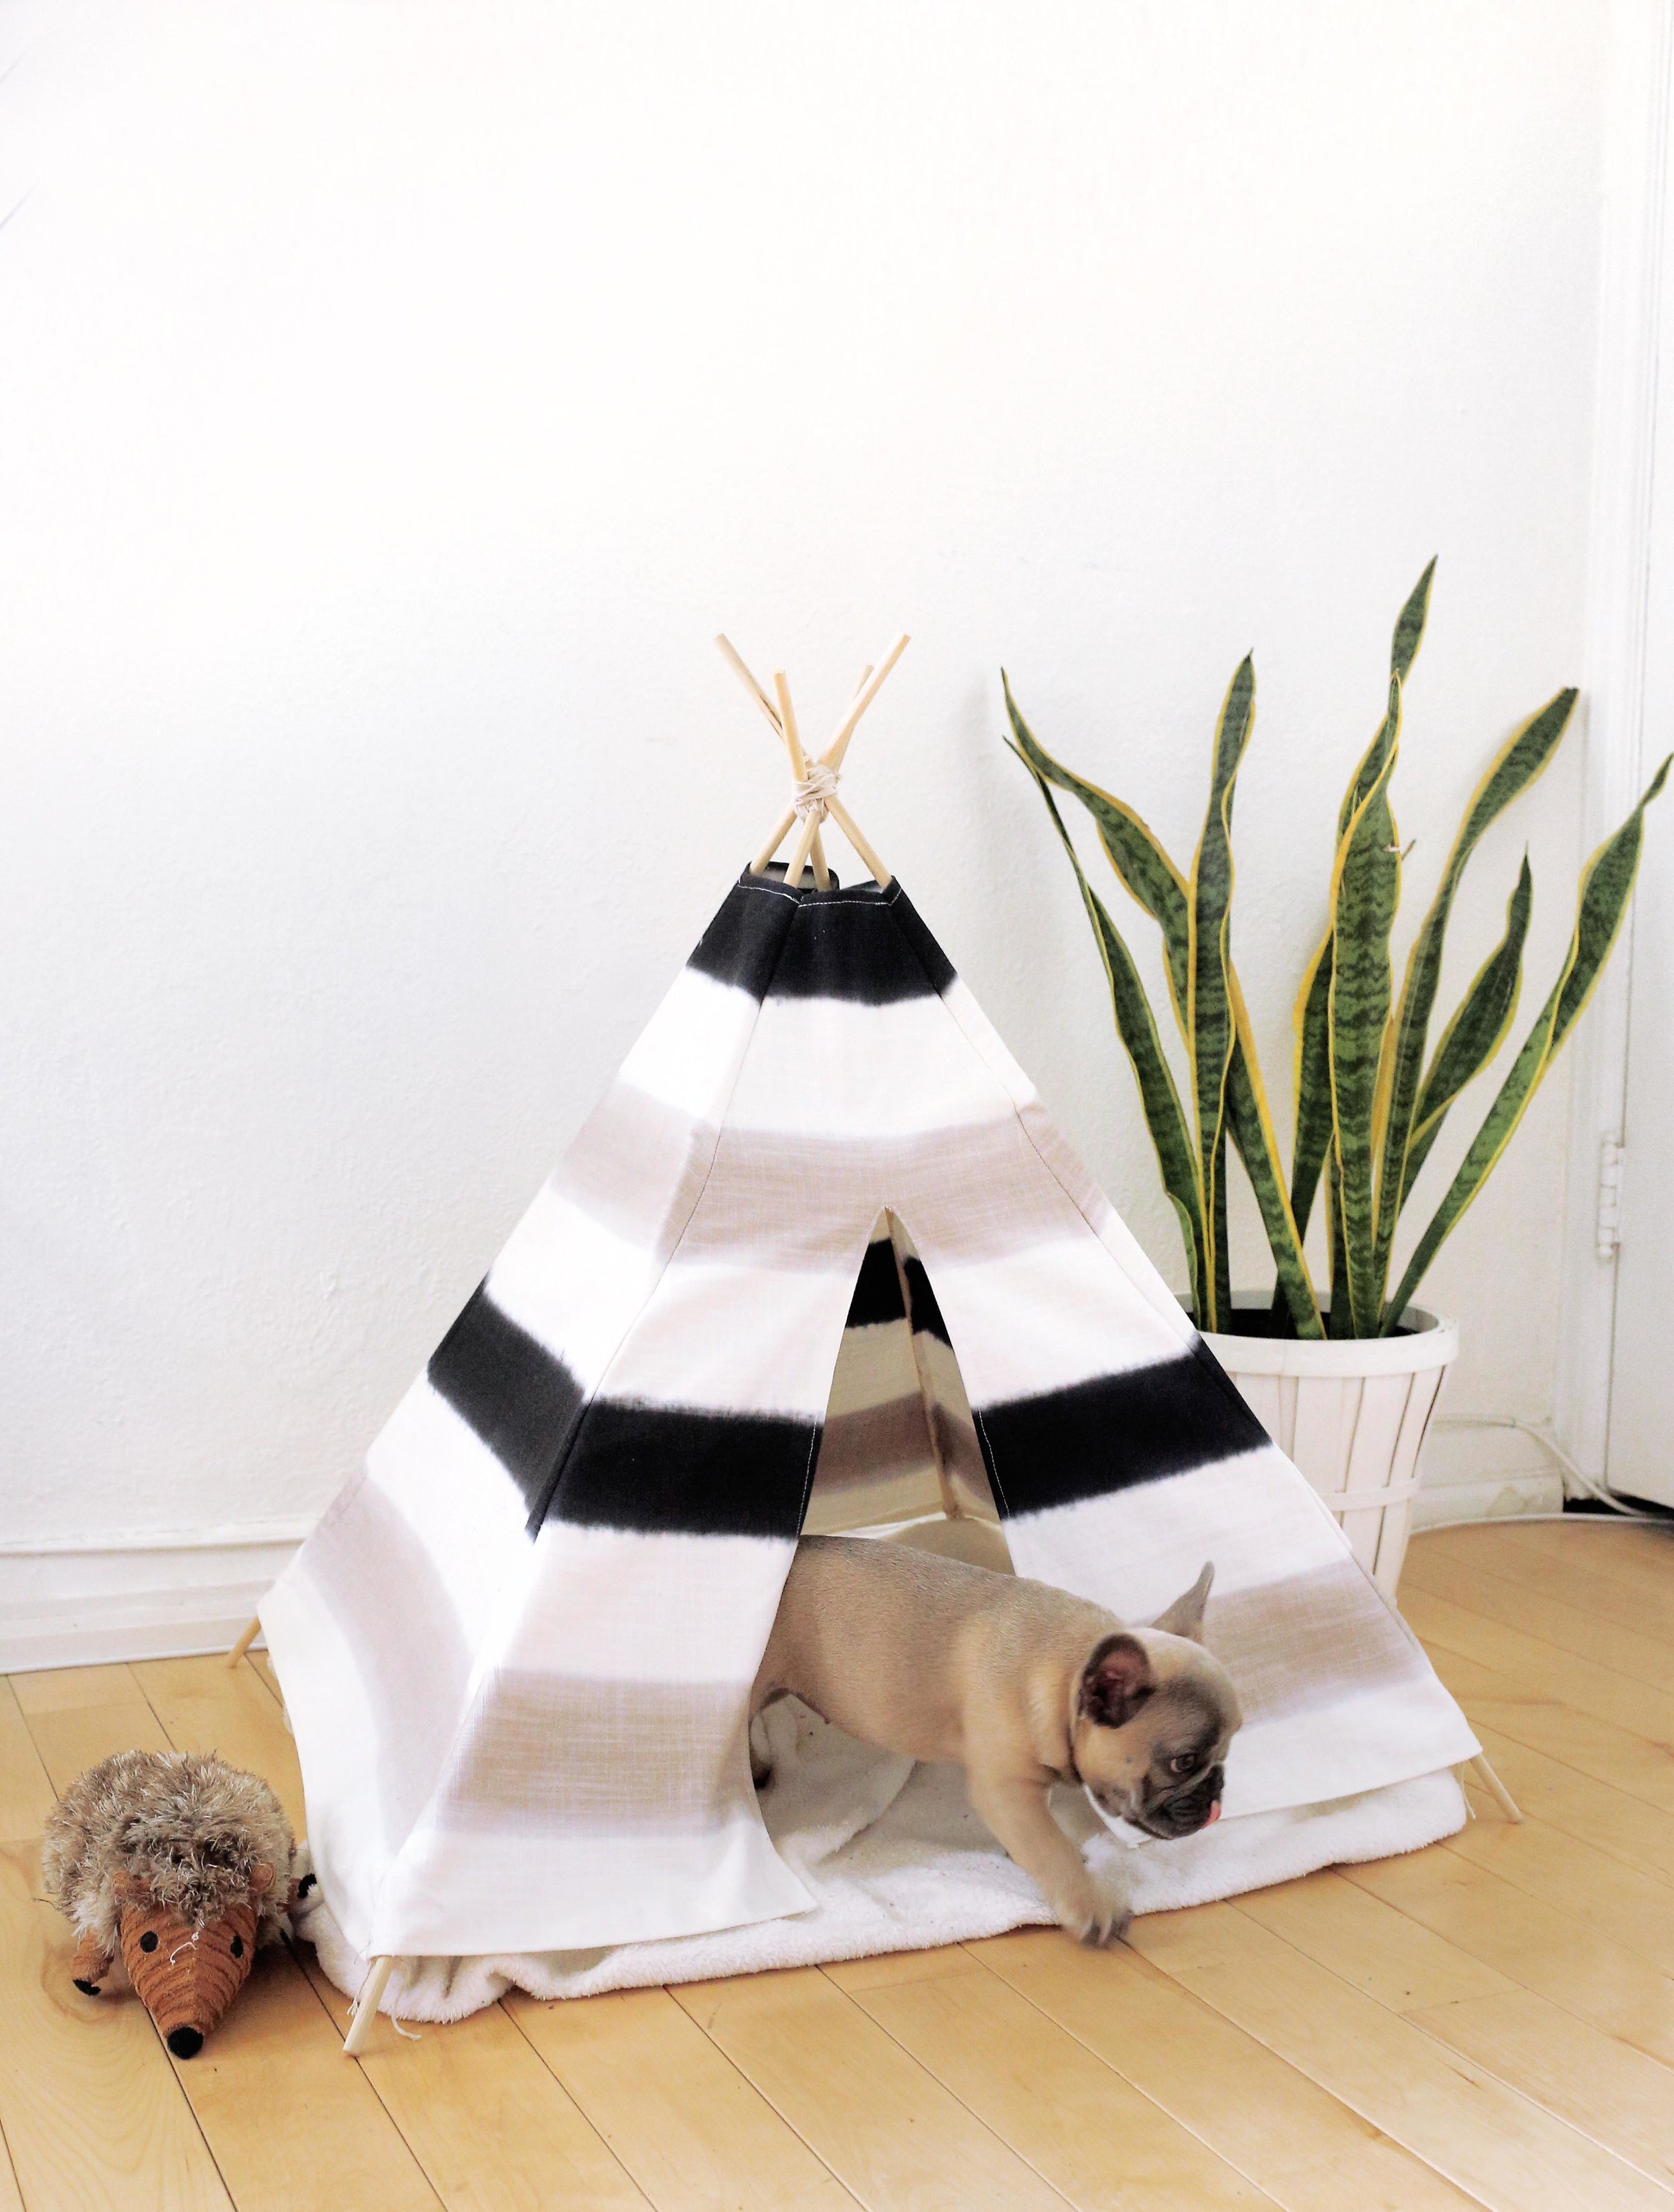
DIY PUPPY / PET TENT

This week across all of our social media platforms, we’re doing Puppy Week! A week filled with pet DIYs and of course, adorable puppies! Today’s dog DIY is a do it yourself pet tent. This is surprisingly easy to build and shouldn’t take long if you’re comfortable with a sewing machine!
Cost:$10 – $50 (dependent on fabric choice)
Difficulty: ✂ ✂
Materials:
– 2.5 m of canvas fabric
– String or Twine
– Four 3/8 in wooden dowels
Tools:
– Ruler
– Straight Edge
– Scissors
– Pins
– Sewing machine or needle and thread

To make our puppy tent, we’re first going to start by making the canvas cover. For this, we’re using this navy and beige striped thin canvas material from the fabric store. We purchased 2.5 m of it. From this we’ll need to cut out 4 triangles. Draw out a line that is 25in long. Then at the halfway point, go up 30.5in and make a mark. Connect this point to the two edges with a straight line. This will give you the triangles size we need. The sides should measure to 33 in long. Cut out this triangle and repeat 3 more times until we have 4 triangles.

Next we need to leave some space at the top of our canvas for the sticks to exit. We made a mark about 26 in up from the bottom and cut slightly above that for seam allowance. Fold over and pin this edge as well as the bottom edge. Sew these up to stop the fabric from fraying. Make sure to repeat these steps for each piece.
Now it’s time to combine our triangles. Line up the edges of your first two triangles with the bad sides facing out and pin them together. Open up the triangle and pin up the next edge with your third triangle. Repeat this until every side is pinned together and your have a loose pyramid shape. Sew up each side.
Now we need to add in the opening gap. Fold your triangle in half to find the middle and then mark about 18 inches up. Cut along this line but make sure you are only cutting through one layer of fabric. Again you’ll want to fold, pin, and sew this new edges to stop them from fraying.

As a final step to our tent cover, we need to add on little ties to keep our fabric to the stand. Using some small bits of white string a few inches long, stick the middle onto the bottom of each point of the pyramid. We also added two closer to the top on the front panel.
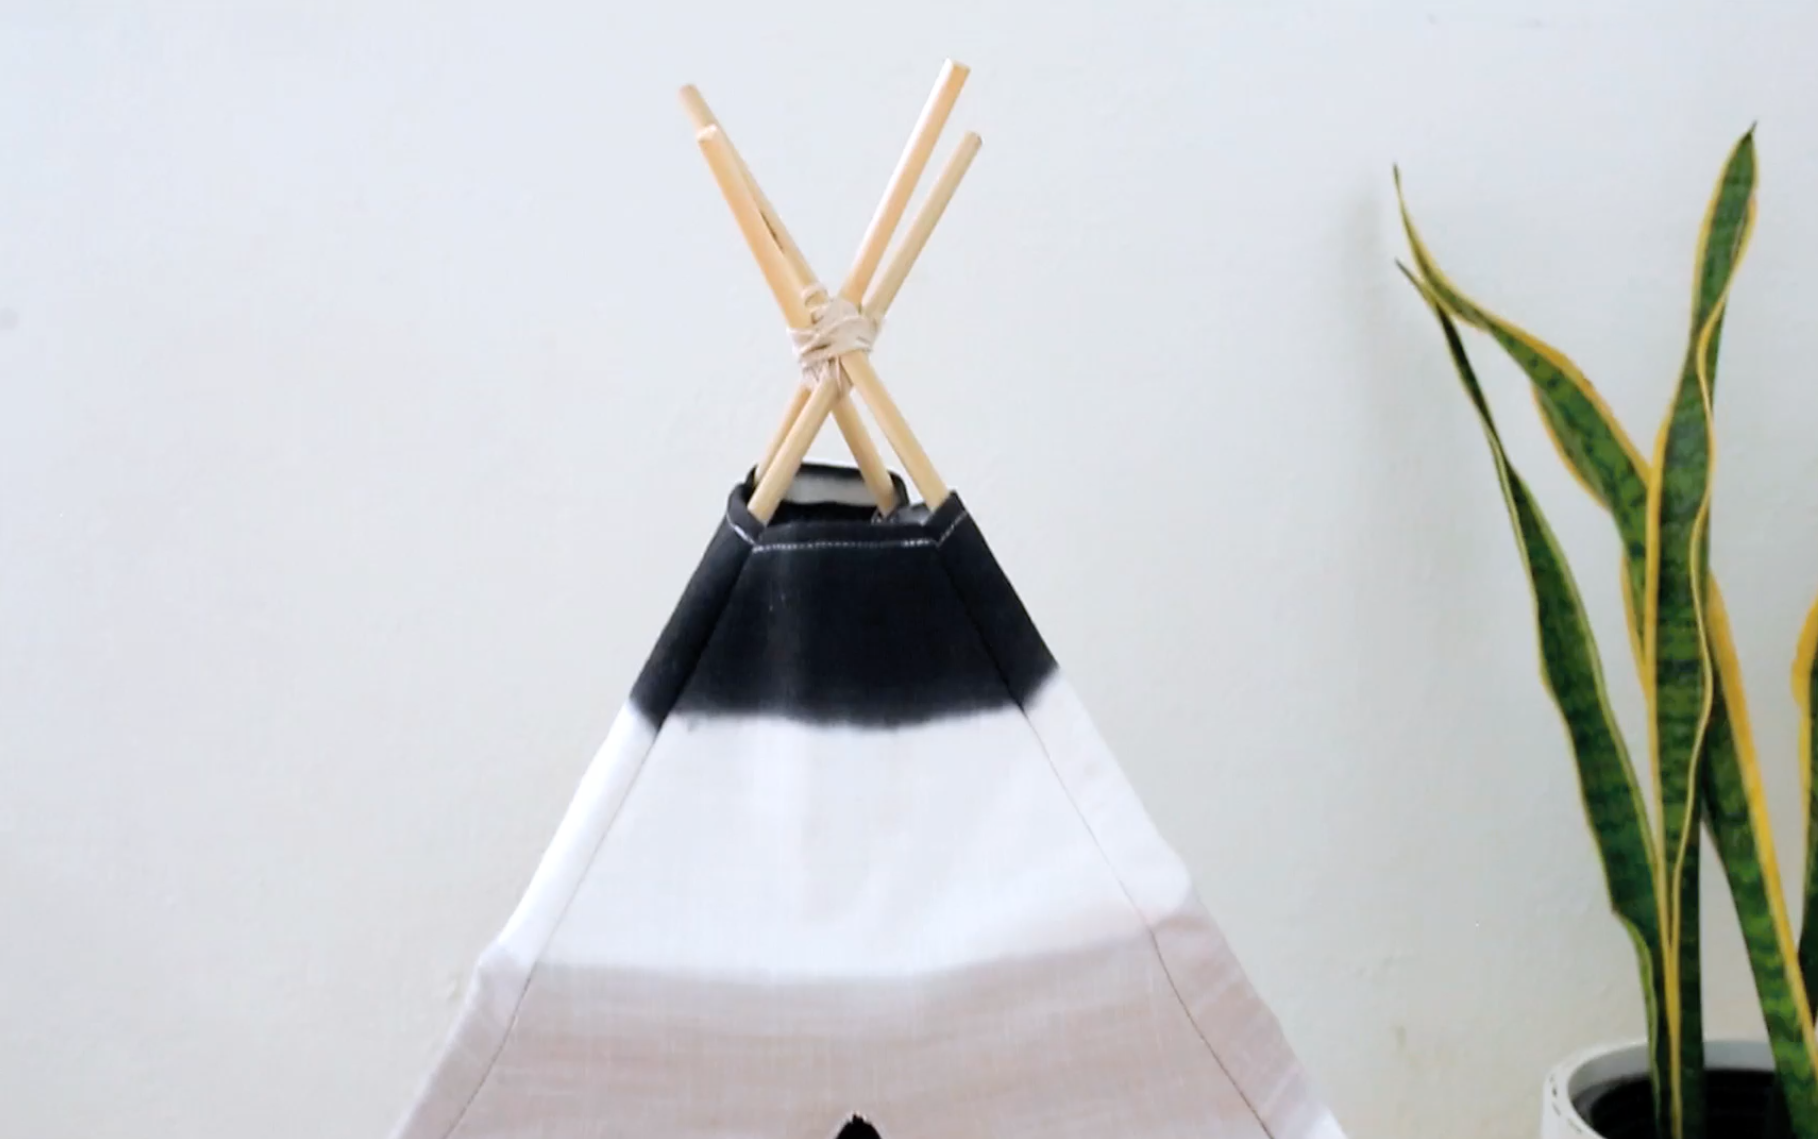
Now it’s time to build the wooden structure. Start by gathering your tent poles. We’re using 4 wooden dowels that are 3/8” in diameter and we cut them to be 37 inches tall. Obviously you’ll need to adjust the scale of this entire project for a larger dog. To tie the dowels together we’re going to be using the same white string we used for the tie. Twine would work just as well but we liked the look of the white against our fabric. Cut a long amount of the string and start by bringing in two of the dowels. Tie the string to the first dowel with a simple knot. Next wrap the string around the poles multiple times horizontally. Make sure you are pulling tightly. Next bring the string up to the top and down through the middle of the two poles.

Gently pull apart the poles to a distance slightly wider than our 25 in panels and being to wrap the string vertically between the poles. Again make sure you are pulling tightly. You’ll know you’ve wrapped enough when you aren’t able to bend the poles in together. Once it’s nice and secure, knot off the rope. Now with our last two poles, repeat the first steps by wrapping some string around horizontally, and then bringing the string down the centre and spreading the poles. Place the 2 new poles on top of your previous two to form a giant X shape.

Now wrap the string around the combined pieces vertically. Again you should feel it getting tight and it should be hard to push your poles inward. Once you’re done, knot off the rope but this time we are keeping the extra hanging to use as a finishing touch after.
Bring in your canvas cover and slide it over the poles on top. The canvas shape will push the poles tightly together to form a solid structure. Knot up the ties. Lastly we’re taking that extra string and wrapping it around the poles horizontally to give it a clean finish and to hold this final shape in place.
Lastly all you’ll need are some tent decor pieces of your puppy’s choosing and your tent is move in ready!
Watch the video below for more detailed instructions! (And more puppy action!)